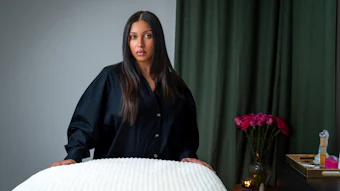
Offering a specific eye treatment within your esthetics practice can provide great benefits for your clients’ skin care needs. Common concerns affecting the eye region include puffiness, dark circles and expression lines. While these concerns may be due to genetics, diet, lifestyle, stress, allergies or physical conditions, regularly treating the skin of the periocular area will improve tissue health.
Begin the treatment with a consultation and intake form to determine clients’ concerns, check contraindications, product allergies or sensitivities. Modify the treatment to suit each client as necessary. Ask clients to remove contact lenses for their safety.
Step 1. Cleansing (5 min.)
This 30-minute Revitalizing Eye Treatment begins by cleansing the eye area, brows and lashes with an appropriate cleanser for the eyes dispensed onto dampened cotton pads.
We need to ensure the area is free from makeup, sebum and cellular debris to give us a clean canvas to work with and prepare the skin for the following steps of the protocol.
When cleansing around the eye area, be sure to use enough pressure to be thorough. If you’re too light, you’ll leave behind makeup residue. If you’re too heavy handed, it will feel uncomfortable for the client and you’ll risk getting product in the eyes.
Clean one eye at a time by bracing and slightly raising the brow with one hand, keeping the skin taught so you can give a more thorough cleanse. This bracing action stretches out tiny crevices, fine lines and crepiness where makeup and cellular debris can settle. Using this technique is especially important when the client has less elasticity in their skin, because they will also experience crepiness in this area.
Finish off the cleansing routine with warm, damp sponges, wiping away cleanser residue. Remember to wipe under the eyes too, completing the first step.
Step 2. Exfoliation (5 min.)
It’s vitally important that you check with your product manufacturer whether the product you intend to use is suitable to be used on the eye area, not just around the eye area.
Some enzyme-based exfoliants may be suitable, as they have a gentle, yet effective action. By using a small fan brush, you’ll be able to apply a thin, even layer of product, minimizing product waste and staying cost effective. Keep clear of the lash line, so no product can enter the eyes.
Gentle enzyme formulations will leave the skin feeling, softer, smoother and more absorbent to action ingredients that will be applied later. Look out for ingredients such as daisy flower extract and phytic acid that brighten the skin.
As the skin around the eyes is 110 times thinner than the rest of the facial skin and sometimes more sensitive, the exfoliant doesn’t need to be left on the skin for too long. Three minutes is usually long enough time, but be sure to ask the client if they feel any sensations and remove before three minutes if necessary.
Step 3. Eye Massage (7 min.)
Using a fine textured hydrophilic oil, sparingly applied, prepares the area for the massage. Specific massage sequences for the eyes address the most common client concerns regarding their eye area: puffiness, dark circles and expression lines.
Movements to increase blood flow help flush stagnant waste, as well as nourishing and oxygenating the tissues. This, in turn, helps reduce dark circles and plump out fine lines. Lymphatic drainage movements help to reduce puffiness.
Stretching tense muscle fibers of the procerus muscle between the brows allows them to relax, so the overlying skin is smoothed out, lessening expression lines.
Lighter pressure is required when manipulating the skin and tissues under the eyes, which also have a deeply calming and soothing effect. With the correct manipulation of the small muscles and precise pressure on nerve endings, we can quickly relax the client and reduce their stress.
Remove the massage medium by dipping your fingers into a bowl of clean, warm water and working into the skin to emulsify the hydrophilic oil. This will form a milky solution, as the oil is broken down, allowing it to be wiped away with sponges to leave no oily residue on the skin.
Step 4. Serum & Mask Application (3 min.)
You will find it useful to use fingertips when applying liquid products such as serums because it allows a small amount of product to be dispensed and it feels fabulous for the client.
Hydrating ingredients such as hyaluronic acid or peptides to stimulate collagen production are great to use at this stage.
Follow with a small fan brush application of a gel or creamy, non-setting mask smoothly applied around the entire area. Useful ingredients with antioxidants and anti-inflammatory properties can be found in anthocyanins derived from black rice, as well as epigallocatechin gallate (EGCG) from green tea to offer protection from free radicals.2
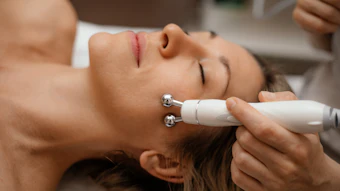
Step 5. Thermotherapy (2 min.)
To assist in the penetration of the products, a microcurrent device with the additional feature of thermotherapy may be used at this time. The warmth of the tip further assists in softening and relaxing the skin while encouraging product absorption.3 As well as increasing blood circulation, the microcurrent activates the fibroblasts responsible for collagen production.
Use light rotary movements, sweeping effleurage strokes on the lower eye lid and eye orbit, as well as employing a firmer lifting motion over the upper orbicularis oculi and corrugator muscles.
When using electrotherapy, skin care products must be water-based so they conduct the current. Oil-based, or products with a high oil content simply will not conduct the current, and you won’t get the desired results.
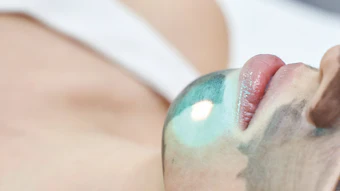
Step 6. Cryotherapy (5 min.)
In contrast to warming the tissues, a mild form of cryotherapy, ice globes, are used next. Before proceeding with this step, be sure to let your client know they will be cold and introduce them slowly to the skin.
Some of the actions of using tools like these is to constrict the tissues, the muscles, the skin cells, hair follicles, blood capillaries and lymph capillaries. It can be thought of as having a flushing action on the eye area, especially if thermotherapy was used beforehand.
The benefits you get as a result of constricting blood flow through the capillaries are an improvement in dark circles, as the skin in this area will appear brighter. The skin’s tone will be more even, as redness and inflammation are reduced. This also leads to less puffiness around the eyes. Cryotherapy also helps seal in action ingredients, boosting efficacy for longer lasting results. The skin will feel firmer and tighter to your client.
Keep your movements slow, even and rhythmical. Using slower movements is useful for a couple of reasons. Firstly, by using slower movements, you will be more present in the moment and more mindful. Secondly, you’ll have greater control over your tools. When you stay slow and mindful, you’ll avoid the globes from colliding into each other so they don’t create an irritating noise.
If the serum and mask have absorbed into the skin at this point, you can always apply a layer of gauze over the area to allow the globes to move easily. Remove any residue of mask with warm, moistened sponges.
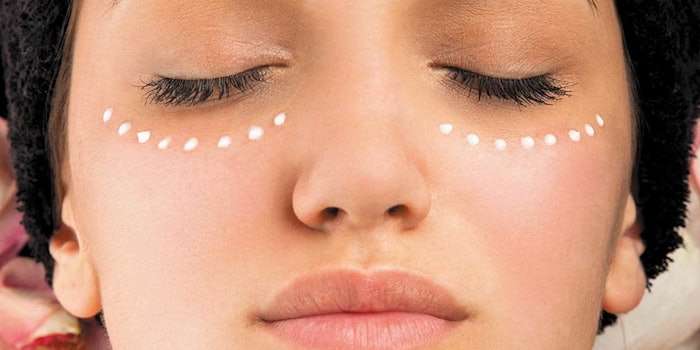
Step 7. Nourish & Protect (3 min.)
To further hydrate the eye area, a hyaluronic acid-based serum can be applied with a fingertip application. Evenly dot the product around the eyes and use circular motions to work the product into the skin. Circle in the natural direction of the brows and inward on the lower lid. This is following the direction of muscle fibers of the orbicularis oculi, from the muscle’s origin.
Follow with an application of eye moisturizer to seal in the serum, build the barrier function and prevent moisture loss. A superb ingredient is carnosine (L) benfotiamine, and patented chirally-correct endogenous free radical scavenger and anti-glycation product. It helps keep collagen and elastin fibers supple and maintain elasticity.
Finally, the last product to be applied is a sun protection factor. Use a physical sunscreen with natural zinc oxide, a broad-spectrum ingredient protecting against UVA and UVB radiation. This may be applied with a slightly moistened beauty blender to ensure you have an even spread of SPF, while also feeling great to your client.
Home Care
Follow up with product and home care advice, including the following.
- Eye makeup removers, serums, eye creams, eye pillows and mineral-based SPF are all retail products that may be offered.
- Drink plenty of water to stay hydrated, adding citrus fruit or cucumber to help with absorption.
- Recommend regular eye exams. Poor eyesight can lead to habits of squinting and frowning.
- Wear sunglasses in bright sunshine to limit squinting. Constant unnecessary expressions lead to fine lines and wrinkles. Having said that, “happy” smile expression lines add beauty and character to the face.
- Include a physical SPF to morning skin care routine.
- For puffy eyes, suggest that clients sleep with head and upper body elevated with more pillows.
- Be gentle when treating the skin around the eyes and avoid rubbing and tugging.
- This entire treatment may be offered as a standalone treatment or offered as an add-on service to facial treatments.
Gaynor Farmer-Katics is passionate about teaching estheticians how to refine their touch by increasing their repertoire of massage techniques. With almost 40 years of industry experience as an esthetician, massage therapist and educator, her business Enhanced Touch offers both online and in-person training. Find out more at www.enhanced-touch.com.