A big beauty buzzword that your clients are hearing is customization or “bespoke” products and experiences. It seems like a no brainer, since everything we do in the professional skin care market is considered customized. We analyze skin, choose products based on what we see, then perform the manufacturer protocol. We may be missing a big part of the whole customized process—the protocol. Here are some simple steps to help you provide true customization for your clients.
Step 1. Skin Assessment and Client Consult
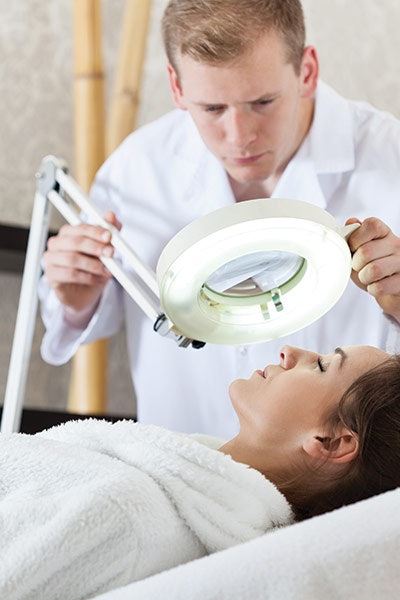
The skin assessment and client intake form are the most important parts of designing a custom experience. It takes a high level of active listening and a little detective work to create an experience that keeps the client coming back. Here are the key areas you need to look at with the first treatment.
Skin type. This is based on oil production. Use a woods lamp to help see secretions. Skin type helps you determine the type of products to use.
Fitzpatrick type. This will help you determine the level of sensitivity to modalities that could cause hyperpigmentation. It will also help you choose the type of UV protection to instruct your client to use.
Skin conditions. This is generally why a client is coming to see you. Usually, there is a primary and secondary condition that you will see. For example; hyperpigmentation usually has an underlying level of sensitivity that must be addressed.
Medical issues. This will help you narrow down contraindications and identify potential complications.
Contraindications. This works with medical issues and narrows down the type of products and devices that can be used.
Client concerns. This is one of the most important parts of your assessment. If you do not address issues that the client is coming to see you for, they will not come back.
Step 2. Determine Your Results
Identify two conditions that you would like to see improved. Often, multiple areas that need improvement show up in the initial assessment. It’s important to document all conditions you see but only choose two that can be treated in one treatment cycle.
Match those areas to the concerns your client wants to see. Conflicts happen here. Clients only see the acne or pigmentation issues. Estheticians will see the underlying issues like inflammation or hyperkeratinization of the hair follicle. Adding to this is dietary and lifestyle issues that you will identify. Often the client does not see the connections you do.
Keep it simple. Here are the basic areas that can be impacted within a facial and give the client the results they want quickly:
- Improve hydration,
- Improve texture and
- Improve color.
Step 3. Identify Your Tools
The products you have currently in your treatment room will help you determine what you can do to customize a protocol. Categorizing your backbar will also help you see if you have any missing areas that need to be filled or techniques you need to learn.
Here are some common product, devices and techniques to have in your treatment room to improve hydration, texture and color.
Products. Most product lines have protocols written for professional and home care use. Your product knowledge training is essential here. If you have purchased a product line and have not mastered the knowledge needed to use it, then following the prescribed protocols is your best option until you gain more experience.
- Cleansers (include makeup removal)
- Toners (pH balanced, astringent)
- Serums (hydrating, soothing, anti-aging etc.)
- Masks: setting (alginate, peel off, fiber) and non-setting (cream, gel, clay)
- Massage medium (oil, cream)
- Moisturizer and SPF: (all skin types, non-chemical SPF)
- Eye Cream (gel, cream)
Devices. Devices are essential for a professional treatment. They allow you to get better results, save your hands and provide an experience that your client cannot get at home. Even the devices sold for home use cannot compare to our technology when used correctly. Devices do not need to break the bank. More expensive does not mean better. Some devices useful in facial protocols are provided below.
- Galvanic current
- Microcurrent
- Microdermabrasion
- Ultrasonic spatula
- LED (retail options available as well)
- Steamer
- Brush machine
- Spray/vacuum
- High frequency
Techniques. Techniques are part of your overall modality approach. These are important for your esthetic skill set and often require further training. Techniques to be used can include the following.
- Massage. This can include specialty massage and lymph drainage (requires additional training).
- Skin assessment. This is essential for results.
- Product application. Some estheticians use brushes or have other special applications that make the movements flow.
- Extraction. This is a skill you must master to avoid additional breakouts and discomfort.
Step 4. Understand How Your Tools Impact the Skin
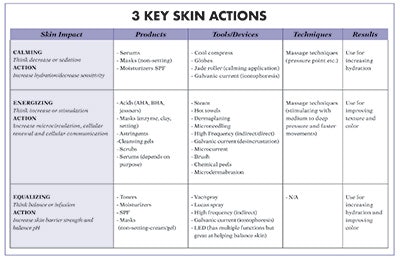
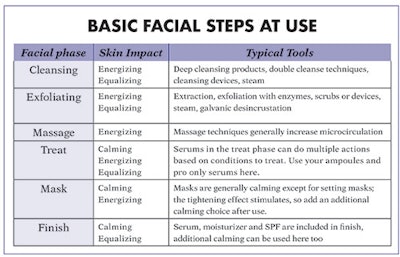
To keep it simple, use three key actions (see 3 Key Skin Actions) that you can do to impact skin. They are calming, energizing and equalizing.
Step 5. Put it Together
There are some basic steps in every facial that should be used for results. In Basic Facial Steps At Use, you will find a quick chart that will help you see where your products, devices and techniques could be used.
Worth The Time
It may seem complicated to create your own protocol, but spending some time looking at how you can create a custom experience will pay off with increased client retention and better results. If you are an experienced esthetician, this will also challenge you to take a good look at the results you are getting with your existing protocols.


